TALLY Notes

Introduction of tally
⟿ Tally is an Accounting software in which we can record all the business transactions through ledger and different types of ledger vouchers. It maintain reports such as Balance sheet, profit and loss alc Ratio analysis, cas flow statement ,Funds flow statement ,Trial balance and many more with the latest version of this software TALLY 9 ,you can do different types of works such as:-
Do all the basic accounting function
Manage your store and items
Maintain budget
Calculate interest on pending amount
Manage payroll
Manage stocks on Godown and many more others features
In fact ,intoday’s environment you just need a computer and Tally to manage your business and you to Run it , It was developed in India.
Accounting
Manual Accounting and TAlly Accounting
Procedure to open tally
Click on tally icon of Destop and press enter
Another method
Click on start button of status bar
Clock on program
Click on run (Run Dialogue box will appear)
Type ‘ c:/Tally9/Tally9 ,exe’ and press enter
How to create Company
Steps:
Go to the Company Info (Alt + F3)
Click on create a company then a company creation form will appear
In a form
Type the Company in the name option
Type the another option as required
Press the enter or “ Ctrl +A “ to save or create the company.
To Modify and Delete Company
⟿ It is used to modify ( Alter ) and Delete the Company you have already created .
Steps:
Go to the Company Info ( Alt +F3 )
Click on Alter if you want to modify or change
Select the Company which Company you would like to Modify ( Alter ) and press Enter.
( Then a Company creation Form with appear. )
You can Modify( Alter ) which you want to modify on your created Company and press the Enter as required or Ctrl +A to save the company.
Click on Alter if you want to Delete the Company .
Select the Company and press Enter Company creation Form will appear
Press Alt +D and Press Enter as required to delete the Company.
Ledger
⟿ A Ledger is the actual account head to which you
identify a transaction . In Tally you pass all the
accounting vouchers using Ledgers . However, all
ledgers have to be classified into groups. It means
that the Group is a collection of ledgers which
have the same natures.
Steps 👍
Go to the Gateway of tally
Click on Account info
Click on Ledger
Click on create Single/ Multiple Ledger
Type the name of the ledger, select the Group where it lies.
Finally , press Enter as required or “Ctrl+A” to save the ledgers.
Vouchers and Types of Vouchers
⟿ A vouchers is a document containing the details of transaction for every transactions you make a vouchers in tally.
It allows creating different types of Vouchers ( Voucher types ) which helps you to create Voucher.
Vouchers type 🙂
⟿ Tally program provides 20 Vouchers types .
There are two kinds of Voucher type i.e
Accounting Vouchers and Inventory Vouchers.
Accounting Vouchers And Inventory Vouchers
How to create Voucher type 👏
Select “Accounting Info” or “Inventory Info”
from Gateway of tally .
Select Vouchers types
Select create
( Dialog will appear )
Vouchers
Contra Vouchers ( F4 ) 👍
⟿ According to the Accounting rules ,
when the current Assets ( Cash and Bank )
are affected in the side of Debit or
Credit while making the journal ,
The transaction should be in Contra Voucher.
The following points helps us to know about
its ( contra voucher ) Nature .
Cash account to Bank account
Bank account to Cash account
Bank account to Bank account
For e.g.
Cash Deposit into Nepal Rastra Bank Rs 5000.
Nepal Rastra Bank Alc …………Dr 5000
To Cash Alc…………………….5000
(Being cash deposit into NRB .)
Cash withdrawal from Nepal Rastra Bank Rs 8000.
Cash Alc …………………………..…..Dr. 8000
To Nepal Rastra Bank Alc………..8000
(Being cash withdrew from NRB .)
Cash Transferred from Nepal Rastra
Bank to Laxmi Bank Alc Rs 15000
Laxmi bank Alc ………………………….Dr. 15000
To Nepal Rastra Bank Alc…………15000
(Being cash transferred from NRB to
Laxmi bank .)
2.Payment Voucher ( F5 ) 👍
⟿ When we pay the amount by cash or cheque to another account and it is affected on the
side of Credit then we should do the entry in the
payment voucher.
For example
Cash paid Rs 150000 to Maruti suppliers .
Maruti Suppliers Alc ……..Dr. 150000
To cash Alc…………………150000
(Being cash paid to maruti suppliers .)
Salary paid Rs 10000 to staff by
Nepal Bank.
Salary Alc ………………..Dr. 10000
To Nepal Bank Alc…….10000
(Being salary paid to staff by nEPAL bANK .)
Computer purchase of Rs. 30000 in cash
from Sherestra.
Computer Alc ………….…Dr. 30000
To cash Alc………………30000
(Being computer purchase from
Mr.sheresta on cash .)
3.Receipt Voucher ( F6 ) 👍
⟿ When we receive the amount by cash
or cheque from another account and it’s
effected in the side of Debit then we should
do the entry in Receipt Voucher.
For examples:
Computer sold for Rs 30000 in cash to Shrestha.
Cash Alc ……………………….30000
To Computer Alc………..30000
(Being computer sold on cash to Mr.shrestha .)
Cash received Rs.10000 from Maruti customers.
Cash Alc………………………….Dr. 10000
To Maruti Customers Alc……..10000
(Being cash received from Maruti customers .)
Interest received Rs 50000 From Maya.
Cash Alc …………….…..Dr. 50000
To Interest Alc ……….50000
(Being interest received from Maya.)
Ram started Business with cash Rs 200000
Cash Alc ……………Dr. 200000
To Ram Alc……..200000
(Being Ram started business with cash.)
4. Journal Voucher ( F7 ) 👍
⟿ This voucher is used to record the non-cash
( cash, Bank ) and an adjustment transaction
which can’t affect the side of Debit and Credit.
For example:
Computer Purchase of Rs 30000 from Rakhi.
Computer Alc …………….Dr. 30000
To Rakhi Alc………..30000
(Being computer purchase from RAkhi.)
Furniture sold for Rs 12000 to Deepali.
Deepali Alc ………..………Dr. 12000
To Furniture Alc………….12000
(Being furniture sold to Deepali.)
Depreciation charged on land and Building Rs 5000
Depreciation Alc …………………….Dr. 5000
To Land and building Alc……..5000
(Being Depreciation charged on land
and building .)
5. Sales Voucher ( F8 ) 👍
⟿ When the Goods/Inventories ( which are sold for Business purpose ) sold on cash or non credit
then we have to Enter it in sales Voucher.
For example:
Goods sold of Rs 5000 to prakesh.
Prakesh Alc ………….Dr. 5000
To sales Alc……..5000
(Being Good sold to prakesh .)
Good sold of Rs 12000 on cash.
Cash Alc ……………….Dr 12000
To sales Alc…………12000
(Being Good sold on cash .)
Computers parts sold on Cash (Bill no 450)
to sherestha are as:
6. Purchase Voucher ( F9 ) 👍
⟿ When the Goods/Inventories ( which are purchase for Business purpose ) purchased
on cash or non credit then we have to
Enter it in purchase Voucher.
For example:
Goods purchase of Rs 5000 From RAkesh.
Purchase Alc ……………….Dr. 5000
To Rakesh Alc……………5000
(Being Good purchase from Rakesh.)
Goods purchase of Rs 45000 on cash.
Purchase Alc ………..Dr. 45000
To cash Alc……….45000
(Being Good purchase on cash .)
(Note: Dr. वा Cr न आएमा press Ctrl + V )
7. Credit Note (Ctrl +F8 ) 👍
⟿ Through this menu, The company keeps
the transaction of return goods which have
already been sold. It means, it helps us to keep the transaction of sales return.
8. Debit Note ( Ctrl + F9 ) 👍
⟿ Through this menu, The company keeps the transaction of return goods which have already been Purchased.
It means, it helps us to keep the transaction of Purchase return.
Series of Action to active
Debit and Credit Note 🎉
Press F11 ( Features ) from anywhere and then set “Yes”
Debit Note / Credit Note and save it by pressing “Ctrl +A”
9. Memo ( ) 👍
10. Index ( ) 👍
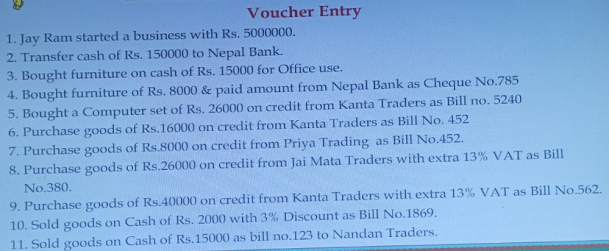
Voucher Entry


Currency
The Currency is used to convert the rate of
exchange of foreign Currency into company
currency or Home Currency . It we want to use
Currency in our company then we have to follow the
following steps 😀
Steps 👍
Press F11 : Feature Button
Set “yes” in the “Allow -currency” option
on the accounting features window.
Then press “ Ctrl +A to save it .
[ Alter this setting we can see the “Currencies” option
in the Account into Menu ]
🎉 Use Currency Menu to create Currency Symbol ,
Modify or Delete Currency Symbol , Create Rate of Exchange .
Some task to create the Currency Symbol
Gateway of tally
Account Info
Currency
Create the following Symbol
🎉 After creation , Try to Modify , Display and Delete the symbol of Currencies.
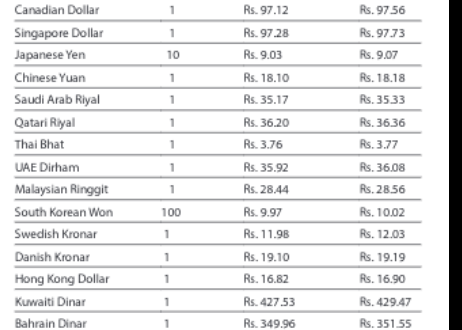
Some Task to create RAte of Exchange
Steps 👍
Gateway of tally
Accounts Info
Currency
Rate of Exchange
The Rate of Exchange are as follow:
Std RAte भनेको purchase Rate र Selling Rate को
Minimum RAte हो।

Do the following Transactions


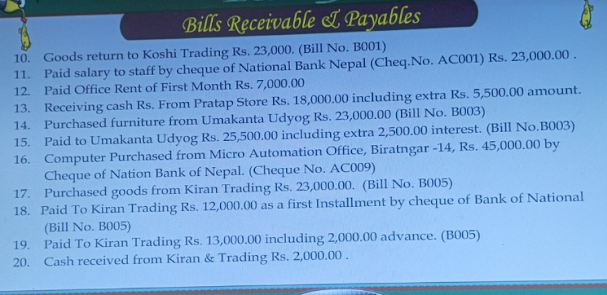
Bills Receivable and Payable
⟿ In modern Business, It is very important to keep the record of the Bills. Tally is a very easy programme which helps us to keep the Receivable Bills and Payable Bills of Credit days. If the Payable bills are not done at a time, you can keep it one by one too.It means goods
which are sold or purchase on credit and when its
Credit date will be expired, then tally helps us to create the report of “Payable Bills” and “Receivable Bills” And of course, the type of report facilities will be very important for the Businessman, Those who operate their business on Credit also.
Setting for the Bills Receivable and Bills Payable
Gateway of Tally
Then press F11 : Features and then set “Yes” at
“Maintain Bill wise Details”
But don't make “yes” get ( for Non Trading Alc )also
Because “Maintain Bill wise Details” means only use bills in
Sundry
Debtors and Sundry Creditors.
Types of Reference Method
In tally there are 4 types of Reference Method
about the Bill Form there, we can select any. But each
Method has its own meaning and use.
New Ref 🎉
⟿ It is used in the condition of “Purchase Goods and Sales Goods” on Credit .
For example :
(A.) Purchase goods from Shrestha Rs 150000.( Bill No. Pb001)
(B.) Sold Goods to Raju and Preity Traders Rs 120000
( Bill No Sd001 )
2. Agst ( Against ) Ref 🎉
⟿ It is used in Against of Payment and Receipt Voucher, and the transactions which we Purchase and
Sale on Credit and which use have selected in “New Ref”
For Example :
(A.) Cash paid of Rs 150000 to shrestha.( Bill No Pb001 )
( B.) Cash Received from Raju and preity traders
Rs 120000( Bill No Sd001 )
3. Advance 🎉
⟿ It is used for Payment and Received but more than
responsible for payment received. Means
“Advance Received and Payment”.
For Example 😭
(A.) Cash paid for shrestha Rs 180000. ( Bill No. Pb001)
[ It will be advance, Because we had purchase goods on
Rs 150000 only but now were going to paid Rs 30000 in Advance. ]
(B.) Cash received from Raju and preity traders Rs 150000.
(bill No Sd001)
[ It will also be the same.Because of the same reason.
Rs 120000 and Rs 30000]
4. On Account 🎉
⟿ It is used in case of Non-Billing Transaction.
For Example :
(A.) Computer Purchase from shrestha Rs 75000.
(B.)Land and Building sold Rs 135000.
Note:- If you have choose the on account in the
journal voucher then in Payment and Received voucher also we should choose “On Account” in the customer and supplier (Payment and Received voucher ).
To Display Report of Bills Receivable
Steps 👍
Gateway of Tally
Display
Statement of Account
Then Receivable
To Display Report of Bills Payable
Steps 👍
Follow the above rule up to No.3
Then Payable
Note:- To Display in Details, Press Alt+ F1
In this Menu we can see many more Details except Receicable and Payable .Except this, we can follow the following Menu:
Ledger :- This menu helps us to Display the current Due amount of the Bills.
Group:- It is used to Display the Reports
of Sundry Debtors and Sundry Creditors separately.
Receivable :- It means, it Displays the report of total Receivable Bills which are sold on Credit .
Payable :- It displays the Report of Total Payable due bills.
Do the following Exercise .

Interest Calculation
⟿ When we give loan or Received loan then we have to pay or Receive Interest. TAlly provides the interest function to calculate the Interest for the specific Date .
How to enable Interest Calculation
Steps 👍
Press F1
Set “yes” at Interest calculation
Save it
( Sense : Interest Payable )
Example:-
Loan Paid to Dinesh Rs 50000
Dinesh Alc ………Dr. 50000
To cash Alc……..50000
(being loan paid to dinesh )
Creating the Ledger of Dinesh
Name:- Dinesh
Under:- loan and Advance ( Assets )
Achieve:- Interest Calculation “Yes”
Rate:- 3%
Calendar Month
Save it
Interest Payable
⟿ This is Interest Payable which we have to pay
Steps 👍
Gateway of Tally
Display
Statement of Account
Interest Calculation
Interest Payment
( Sense : Interest Receivable )
Example:-
Loan Receive from Rohan Rs 100000
Cash Alc ………Dr. 100000
To Rohan Alc……..100000
(being loan receive from rohan )
Creating the Ledger of Rohan
Name:- Rohan
Under:- loan and liabilities
Achieve:- Interest Calculation “Yes”
Rate:- 36%
Calendar Month
Save it
Interest Receivable -
This is Interest Payable which we have to Receive
Steps 👍
Gateway of Tally
Display
Statement of Account
Interest Calculation
Interest Receivable
Stock Group
⇛ At first we have to create Stock Group to palace the Stock. Assume that your Company will sell different types of mobile, so you have to create a mobile Stock Group. In which there will be different kinds of mobile.
How to create a Stock Group ?
Steps:-
Click on Inventory Info
Stock Group
Create
Name: Type the name of Stock Group
Under: Primary
Steps to Display the created Stock Group
Click on inventory Info
Display
Note:- You can see the created Stock Group
Steps to create Units of Measure
Click on Inventory Info
Units of Measure
Create
Symbol: Symbol of unit measure
Formal Name: Full Name of the Measurement.
Steps to create Stock Items
Inventory Info
Stock Item
Create
Name: Name of the Item
Under: Selected the StocK Group
Units : Select the units of Measurement.
Inventory Reports
To Display Stock Item
⇛ This option is used to Display the record of Selected Stock Items on the company.
Gateway of TAlly
Display
Inventory Books
Stock Items
Select the Item and Press Enter.
To Display Group Summary
⇛ This option is used to Display the record to items according to groups.
Gateway of TAlly
Display
Inventory Books
Group Summary
Select the Group and Press Enter.
Movement Analysis
⇛ This is an important Report according to Stocks. From its sub-menu we can see where stock comes from and where stock has Gone.
⥁ Stock Group Analysis
⇛ From the help of this menu we can see inwards and outward records of any stock Group.
Gateway of TAlly
Display
Inventory Books
Movement Analysis
Stock Group Analysis
Selected the Stock Group
⥁Stock Item Analysis
⇛ This menu is also same as stock group Analysis but from this menu we can directly see the records about the stock items.
Gateway of TAlly
Display
Inventory Books
Movement Analysis
Stock Item Analysis
Selected the Stock Group
Transfer Analysis
⇛ from this report we can see stock transfer from one location from another location. To see this report we have to save the stock journal voucher .
Stock Summary
⇛ This option is on Gateway of TAlly. This report helps us to see the report about all stock on the company. To see the report on details we have to press Alt + 5
To Maintain Multiple Location
⇛ When company stores stock on more than one location we have to create Godown. If we didn’t create the Godown and store the stock it will be stored on Maintain Location automatically by tally.
To Enable Multiple Godown
Press F11
Select inventory Features
Make “Yes” on Maintain Multiple Godown
Press “Ctrl + A” to SAVE
To Create Location/Godown
Select inventory Info from Gateway of Tally
Select Godown
Click on Create
Name :- Type your Godown Name
Under :- Select Primary and Press Enter
Press ‘’Ctrl + A” to save the Godown
Transfer Item from one Location to Another
Select Inventory voucher from Gateway of tally
Press “Alt + F7” to select Stock Journal
We can see two parts of Stock Journal. One Source and Another Destination.
Now On source column Select the Name of Items which you want to transfer.
Press Spacebar on Godown Field and select the source godown.
Type Quantity on Quantity field
Rate and Amount will display automatically
Again Select the name of item on destination column and press space bar to Select destination Godown
Type the Quantity on Quantity field and
Press “Ctrl + A to Save .
To Display Location Report
⇛ This option is used to see the stock on the Godown
Display
Statement of Inventory
Godown
Tally will Show all godown list so select the name of godown which you want to see
Press “Alt + F1” to see on details
To Display Stock Journal Voucher
⇛ This option is used to see saved Stock Journal voucher.
Display
Inventory Books
Stocks Transfer
Now we can see stock journal voucher according to months.
Questions:-
Goods Purchase from Kanta Traders as follows and Palace on the Godown of Biratnagar.
Mouse 120 pcs @Rs 250
Keyboard 70 pcs @Rs 350
Ram 60 pcs @Rs 2000
Motherboard 10 pcs @Rs 4500
Processor 5 pcs @Rs 4500
Goods Purchase from Jai mata Traders as follows and Palace on the Godown of Rani.
Nokia 450 pcs @Rs 8500
Samsung 80 pcs @Rs 9000
Motorola 150 pcs @Rs 5500
Lg 75 pcs @Rs 10500
Gfive 100 pcs @Rs 3500
Goods Sold on Kalika Customers as Follows:
Mouse 25 pcs @Rs 300 from Biratnagar Godown
Ram 10 pcs @Rs 2200 from Biratnagar
Processor 2 pcs @Rs 5000 from Biratnagar
Nokia 75 pcs @Rs 9000 from Rani Godwn
Lg 20 pcs @Rs 12000 from Rani
Goods Return From Kalika Customers as Follows:
Mouse 10 pcs
Ram 2 pcs
Nokia 15 pcs
Lg 3 pcs
Goods Return to Kanta Traders as follows:
Mouse 15 pcs
Ram 12 pcs
Processor 3 pcs
Goods Return to Jai mata Traders as follows.
Nokia 25 pcs
Samsung 15 pcs
Lg 10 pcs
Goods Purchase from Asian Thai Foods as palace it on Godown of Dharan.
Rumpum 600 pkts @Rs 11
WaiWai 1200 pkts @Rs 13
2Pm 750 pkts @Rs 10
Preeti 150 pkts @Rs 9.20
Goods Sold to Rahul Kirana pasal as Follow:
Rumpum 150 pkts @Rs 12
WaiWai 120 pkts @Rs 13.50
2Pm 75 pkts @Rs 10.75
Preeti 25 pkts @Rs 10
Goods Purchase from Shiv Traders and Palace It On the Godown of Dharan.
Handpump 100 pcs @Rs 2000
Waterpipe 25 pcs @Rs 1200
Bicycle 50 pcs @Rs 5500
Chain 250 pcs @Rs 75
Tyre 300 pcs @Rs 350
Tube 300 pcs @Rs 150
Cement 1000 pcs @Rs 750
Asianpaints 1200 pcs @Rs 850
Goods Transfer from Godown of Dharan to Biratnagar.
Handpump 10 pcs @Rs 2000
Waterpipe 5 pcs @Rs 1200
Bicycle 15 pcs @Rs 5500
Rumpum 100 pkts @Rs 11
WaiWai 120 p kts @Rs 13


POS Cash Invoice
POS = Point of Sales
Methods of Creating POS Bill :-
Select Account Info of Gateway of TAlly menu
Select Voucher Types
Select Create
Type POS on Name Box
Select Sales on Types of Voucher
Make “Yes” on “Print after Saving Voucher”
Make “Yes” on “Use for POS Invoicing”
Type “Thank you” on print massage 1
Type “Visit Again” on Print massage 2
Press Ctrl + A to Save it.

Activating the Standard RAtes For Stock Items Use on POS Bill :-
Press F12:Configuration key on GAteway of Tally menu
Select Accts / Inventory Info from the Configuration menu
Make “Yes” on Allow Std: Rate for Stocks Items
Press Ctrl + A to Save it.

Set the Standards RAte For Created Stock Items:-
Select Inventory Info From GAteway of TAlly
Select Inventory Info
Select Alter
Select the Stock Item from the List to set the standard rate
Make “Yes” on “Alter Standard RAtes” on the Alteration form
Now we can see New Box Press Enter on Standard Cost box and set the Standard selling Price
Press Ctrl + A to Save it .

Use of POS Cash Bill :-
Select Accounting Vouchers
Press F8 and Select POS Voucher From the List
Press F2 to Set the Voucher Date
Select Sales alc on Sales Ledger and Press Enter
Enter the Name Of Item and Press Enter as Required
Now the Cursor will be on cash field and Select Cash and Press Enter
Now the Cursor will be on Cash Tendered and type the Amount which the Customer paid and Press Enter
Now the Tally will automatically Calculate the Return Amount
Now Type the Nitration and Save It
While Saving the Print Message box will appear Press “Y” to print the Bill or “No” to cancel the Print order

POS Register:-
= After saving all bill Now We can view the POS Register, Which Show the Report about the cash Sales.
Steps:
Select Display form Gateway of Tally
Select Account Books
Select POS Register
Now, We can see the Report

Purchase Control
Purchase Order (Alt + F4) :-It is used to order about the goods to the suppliers. It’s details must be save by vouchers. It is used to know whom goods were order, when we receive, etc.
Receipt Note (Alt + F9) :- When suppliers get purchase order. Suppliers will send the order item without bill (Challan) and It will be recorded in Receipt note voucher.
Rejection out (Alt + F6) :- When goods were received by Receipt note and some of the goods were damaged. Those goods were return by Rejection out voucher.
Purchase Invoice (F9) :- When goods send through receipt note were checked, suppliers will send invoice and It will be recorded in purchase invoice .
Active purchase control
Press F11 and Select Inventory features
Make “yes” on Allow purchase order processing
Make “yes” on Allow invoicing
Make “yes” on enter Purchase Invoice Format
Make “yes” on use Tracking Numbers (Delivery/ Receipt Notes)
Make “yes” on use Rejection Inward/ outward notes
Press “Ctrl + A” to save the setting
Steps For Purchase Order
Inventory Vouchers
Press F2 to enter the order Date
Press Alt + F4 to bring purchase order voucher
Party Alc Name:- Type the Suppliers Name
Now you can see the box to feel the order details
Order No:- Type the order no.
Purchase Ledger:- Select the item which you want to Order
Due on:- Days to receiving goods
Godown:- Select the Godown to Palace the Goods.
Type the Quantity, Rate, etc.
Type the Narattion
To Display Purchase Order Report:
Display Purchse Order Report
⇛ The Report is used to see the all saved Purchased Order.
Display
Inventory Books
Purchse Order Books
Display Purchse Order Summary
⇛ The Report is used to see the details about all Order
Display
Statement of Inventory
Purchse Order Summary
Now it shows stock summary with only Quantity and Rate (Press Alt + F1 to see on Details)
Now Select the item and Press Enter
Now you can see Order Details Report. Press Alt + F1 to see on details
2. Steps for Receipt Notes :-
Inventory Vouchers
Press F2 to enter the Receipt Date
Press Alt + F9 for Receipt Note
Type the No.of Order on the Ref.box
Party’s Alc Name :- Select the Name of Suppliers
Now you can see the list of order then Select the order No
Purchse Alc:- Select the Purchse Alc
Name of Item:- You can see the list of item which you have ordered
Select the item and Press Enter
Now you can see the List of Tracking Box Select New number and type the Number
Again you can see the list of Order, select the Order no and Press Enter
Enter the Godown, Quantity, Rate accurate.
Save it or Press “Ctrl + A” to save.
To Display the Report of Receipt Note
To Display Purchase Bills Pending
⇛ This means Goods Recived But Bill Not Received.
Display
Statement of Inventory
Purchse Bill Pending
Press Alt + F1 to see the report on details
3. Steps for Rejection Out
Inventory Vouchers
Press Alt + F6 For Rejection Out
Ledger Account :- Name of Party to whom goods are Returned
Fill the required Option and save It.
4. Steps to create invoice of Receipt Note(Purchase Invoine )
Accounting Vouchers
Press F9
Press F2 Enter the DAte
Fill the Required Option and Save it .
Sales Control
Sales Order (Alt + F5) :-It is used to record the order about the goods given by Customers. It’s details must be save by vouchers.
Delivery Note (Alt + F8) :- When we get order. We will send the order item without bill (Challan) and It will be recorded in Delivery note voucher.
Rejection In (Ctrl + F6) :- When goods were send by Delivery note and some of the goods were damaged. Those goods were return by Rejection In voucher.
SAles Invoice (F8) :- When goods send through Delivery note were checked by Customers, after It will be recorded in Sales invoice and sent to Customers.
Physical Stock Voucher
⟿ The voucher is used to record the decrease of stocks. When stock of our company and stock on our tally record will be different then the Physical Stock Voucher will be used to balance the stock.
Steps:-
Inventory Voucher
Press Alt + F10 for Physical Stock Voucher
Press F2 to enter the date
Cost center class: Select Not Applicable and Press Enter
Name of Item:- Select the item
Location:Select the Godown where you are decreasing the stock
Batch No. Select the Batch No. of item
If the item have Mfg. and Expire keep it
Type the No.of item available now
Type the Narration and Save it.
To Display Saved Physical Stock Voucher
Steps:-
Go to Display menu
Inventory Books
Physical Stock Register
Now you can see the report according to month
Use Different Actual and Bill Quantity
⟿ This option will Provide two Quantity columns, where one is Actual and other is Billed. This option is used on the scheme given by the Company. Such as Buy one Get one Free.
Steps:-
Press F11 Inventory Features
Make “yes” on “Use Actual and Billed Qty”
Press “Ctrl + A” to Save it
Now it can be used on Purchase and Sales Invoice.
Note:- When you want to use make it “Yes” or make it ”No”.
Use Multiple Price Levels for Invoicing
⟿ This option is used to fix the price of items in different levels just as Dealer, Wholesaler and retailer.
To Enable Multiple Price Levels
Steps:-
Press F11: Inventory features
Make “yes” on use “Multiple Price Levels”.
Now the company price levels box will appear and type the name of price levels.
Press “Ctrl + A” to save it .
To set Price List
Go to the Inventory info
Price list
Select the Group of items of which you want to fix the price level.
Type the range of item no. and price and the discount percent if there is
Press “Ctrl + A” to save It.
Note: After creating the price level you can only use this features on Sales Invoice.
To Maintain Batch-wise Details and Expiry Dates
⟿ This option is used to control the stock item according to Batch No. and Expiry Date.
This Option helps us to find the Expired stock items.
To Enable Batch-wise Details and Expiry Dates
Press F11: Inventory features
Make “yes” on “Batch-wise Details ”.
Make “yes” on “Set Expiry Dates for Batches”.
Press “Ctrl + A” to save it .
Using Batch-wise and ExpirY Date
Alter the stock items and make some setting
Make “yes” on “Maintain in Batches”.
Make “yes” on “Track Date of Mfg”.
Make “yes” on “Use Expiry Dates”.
Press “Ctrl + A” to save it .
Note: While recording the data on Purchase Invoice you have to fix the Batch No., Mfg. date and Expiry Date of Stock items.
To Display Batches and Expiry Date
Display menu
Inventory Books
Ageing Analysis
Now you can see the stock item with their Batch No. and Expiry Date.
Note: Press “Alt + B” to see the report of only expired item and again press “Alt + B” to see all item.
DATA BACKUP
⟿ This option is used to Backup the company data at another place for safety.
Steps:-
Set Backup from company Info menu
Backup screen will appear,
Source: Type the Source from where you want to Backup the company,
Destination: Type the Destination, where you want to Backup the company
Select the company and Press Enter as Required.
Data Restore
⟿ This option is used to Restore the company data on tally Programme.
Steps:-
Select Restore from Company Info menu
Restore Screen will appear,
Destination: Type the Destination, where you want to Restore the company
Source: Type the Source from where you want to Restore the company,
Select the company and Press Enter as Required.
Export
⟿ This option is used to Export the Report from Tally:
Steps:-
Open the report which you want to export
Press “Alt + E”
Export Dialog box will appear
Press “N” for fill the required setting
Language: Select Default(all languages)
Format: Select Html(Web publishing)
Select the required option and press Enter as required
Now the report will be exported.
⟿ This option is used to Print the Report of Tally:
Steps:-
Open the report which you want to Print
Press “Alt + P”
Print Dialog box will appear
Press “N” for fill the required setting
Select the required option for printing and press enter as required
Now the Report will be Printed
Report
⟿ It is Very important part of Tally Application. If We want to create the Report of Manual Accounting, we must need to do by us which causes, many wrong and takes a long time to create the report . But in case of Computerizing Accounting Report will be generated Automatically.
In Report; we can see BAlance Sheet, Profit and Loss Alc, Stock Summary, Ration Analysis, Trial Balance, Day Book, Account Book, Statement of Account, Statement of Inventory, Cash / Funds Flow and So many things. Therefore It is very important but easy option Provided by Tally.
Day Book with Date Range
⟿ Day Book helps us to Display all the list of Voucher of each DAy. If you want to Display the voucher of the particular Date range then follow the below steps:-
Steps:-
Select “Display” menu from the “Gateway of Tally”
Then, Select “Day Book” menu and Press Enter
Press Alt + F2 and Enter range of Date which you want to see.
(Now, you can see the list of your related voucher)
Cash / Bank Books
⟿ This Helps us to view the Cash (Cash in Hand) and Bank (Bank Account) of your Business of each months. If you want to view the current Status of your cash or Bank Balance the Follow following steps:-
Steps:-
From GAteway of Tally, Select to the Display menu
Then Select “Account Books”
Now, Select “Cash / BAnk Books”
[Now, you can see the current status of cash and Bank.]
Note:= If you want to display the details of these titles then Press “Alt + F1”
Specific Ledger Report:
⟿ This menu helps us to display all the transactions about the particulars ledgers and also to display the opening balance and closing balance of the ledgers . If you really want to view these details, then follow the following steps :-
Steps:-
From GAteway of Tally, Select to the Display menu
Now Select and Press Enter to the “Account Books”
Now, Select and Press Enter on “Ledger”
[Now, you will see the List of Ledger, Which you have created in your company.
Select the Ledger, which you want to see.
Note:- Generally, Here we can’t see the Narration . If you want to Display the narration, then Press F12 on the same screen and then make “yes” on “Show Narration” Option.
Group Summary
⟿ This menu helps us to display the summary of all Ledger Group with their total amount. Suppose, If we Select the “Current Assets” then its display the total amount of its entire ledgers. To Display the Group Summary Follow the Following Steps:-
Steps:-
From GAteway of Tally, Select to the Display menu
Now Select and Press Enter to the “Account Books”
Now, Select and Press Enter on “Group Summary”
[Now, you will see the List of Group]
Select and Press Enter to the Group, which you want to see the report.
Group Voucher
⟿ This menu helps us to display the summary of all voucher Group on the basis of Particulars Ledger. Suppose, If we select the “Current Assets” then it display the vouchers which are related with this Group. If we want to see this features, then follow the following Steps:-
Steps:-
From GAteway of Tally, Select to the Display menu
Now Select and Press Enter to the “Account Books”
Now, Select and Press Enter on “Group Voucher”
[Now, you will see the List of Group]
Select and Press Enter to the Group, which you want to see the report.
Sales Register
⟿ This menu is design by TAlly to view all the details of Sales which may be on Cash or on Credit. From where, we can also Display the Details of Sales of each months.
Steps:-
From GAteway of Tally, Select to the Display menu
Now Select and Press Enter to the “Account Books”
Now, Select and Press Enter on “Sales Register”
[Now, Select the month and press Enter from the window, which you want to Display.]
Purchase Register
⟿ This menu is design by TAlly to view all the details of Purchase which may be on Cash or on Credit. From where, we can also Display the Details of Purchase of each months.
Steps:-
From GAteway of Tally, Select to the Display menu
Now Select and Press Enter to the “Account Books”
Now, Select and Press Enter on “Purchase Register”
[Now, Select the month and press Enter from the window, which you want to Display.]
Cash Flow
⟿ Cash flow helps us to Display the Status of Cash (Source of Receipt and Payment ). It means that Cash is used to Display the Details of total Receipt and Payment of the Cash .
To Display the Details of Cash Flows, We can Follow the following steps.
Steps 🎉
Go to the Gateway of Tally
Select and Press Enter to Display
Select and Press Enter to Cash/Funds Flow
Select and Press Enter to Cash Flow
{Now, Select the month From the Window, which You want to Display}
Note: Press “Alt + F1” to Display the Report in Details.
Funds Flow
⟿ Funds Flow helps us to Create the Report of Total Cash From where We’ve Received and Into.
To Display the Details of Funds Flows, We can Follow the following steps.
Steps 🎉
Go to the Gateway of Tally
Select and Press Enter to Display
Select and Press Enter to Cash/Funds Flow
Select and Press Enter to Funds Flow
{Now, Select the month From the Window, which You want to Display}
Note: Press “Alt + F1” to Display the Report in Details.
List of Account
⟿ This Menu is Design by Tally to Display all Groups, Sub-Group and Ledgers upto Current Data. Without this You can also Modify/Delete the Group or Ledger From here.
If You want to Display the List of Accounts, We can Follow the following steps.
Steps 🎉
Go to the Gateway of Tally
Select and Press Enter to Display
Select and Press Enter to List of Account
{Use the Displayed Window,How much you can use.}
Trial Balance
⟿ Trial Balance helps us to Display the Closing Balance of Account Group/Ledger. It is also Known as next level Report of Ledger.
If you want to Display the Trial Balance, then Follow the Following Steps:
Steps 🎉`
Go to the Gateway of Tally
Select and Press Enter to Display
Select and Press Enter to Trial Balance
{Now, You can see the Report of all Primary Groups.}
Note: Press the Following keys to view the Trial Balance in Different Mode.
“Alt + F1” to Display in Details.
F2:- To Display the Report of Particular Date.
Final Accounts
⟿ To Display the Final Account Report, Press F12: Configuration. Then Select “General” and Set yes at “Use Seperate menu for Final Account.” Then You will get a Final Account menu which contains “Balance Sheet” and “Profit and Loss Account”.
Now We will Discuss about these Two most Important
Reports.
Balance Sheet ➖
⟿ Balance Sheet is the Final Financial Statement that reveals (Displays) the Status of Company as on the Date of Report. Assets Side lists What the Company own (Archives) and Liabilities Side Lists what is owes (Pays or Repays). All Real and Personal Accounts appear in the Balance Sheet.
To Display the Balance Sheet in Details, Set the Following Configuration by Clicking F12 Configuration.
Sources And Application of Funds
⟿ To get the Balance Sheet Showing sources of Funds and Application of Funds Set “yes” at “Show Vertical Balance Sheet” at Configuration Option.
Loss as Negative Profit in Balance Sheet
⟿ To show Profit and Loss in Liabilities Side only (Loss as Negative Profit) in Balance Sheet, Set “yes” at “profit or Loss, Both as Liability” at Balance Sheet Configuration Screen.
Balance Sheet with Percentage Figures
⟿ To Show Percentage Figures in Balance Sheet, Set “yes” at “Show Percentage” at Balance Sheet Configuration Screen.
Balance Sheet Showing Working Capital
⟿ To get the Balance Sheet Showing Working Capital, Set “yes” at “Showing Working Capital Figures” at Balance Sheet Configuration Screen.
Profit and Loss Alc ➖
⟿ Profit and Loss Alc Display the figures of all Nominal Accounts and the Net Profit/Loss. Sales, Closing Stock,Direct and InDirect Income Head Appear in the Income Side. Opening Stock Purchase, Direct and InDirect Expenses appear in the Expenditure Side. Excess of Income Over Expenditure is Show as Net profit, Deficit is Shown as Net loss.
To Display the “Profit and Loss Alc” follow the Following Steps:-
Steps 🎉
Go to the Gateway of Tally
Final Account
Profit and Loss Alc
Note: Press “Alt + F1” to Display the Report in Details.
Profit and Loss Configuration
⟿ At Profit and Loss Alc, Press F12:- To get Profit and Loss Alc Configuration Screen.
Photo
Profit and Loss Alc in Vertical Format
⟿ To Show Profit and Loss Alc in Vertical Format (Trading Account and Income Statement), Set “yes” at “Show Vertical Profit and Loss” at Configuration Screen.
Profit and Loss Alc with Percentage Figure
⟿ To get Profit and Loss Alc with Percentage Figures,Set “yes” at “Show Percentage” on Configuration Screen.
Profit and Loss Alc with Gross
⟿ To Show Profit and Loss Alc with Gross Profit, Set “yes” at “Show Gross Profit” on Configuration Screen.
Profit and Loss Alc as Income and Expenses Statement
⟿ To get Income and Expenses Statement instead of Profit and Loss Alc, Press F11: Feature Button and Set “Yes” at “Income and Expenses Statement instead of Profit and Loss Alc”.
Forex Details
⟿ It is used to Display the Ledger in there Difference Currency Symbol. It means that it helps us to Display the Report in which Currency that the transactions have done. Like Irs, Yuvan, American Dollar, Euro Dollar, Pound Sterling etc.
To Display The Ledger in Forex Details
Steps 🎉
Go to the Gateway of Tally
Display Menu
Account Book
Ledger [Now, You can see the List of Ledger.]
Select Any one Ledger and Press Enter.
Press F12: Configuration, Then Set “Yes” at “Show Forex Transactions” and Show “Forex Details”.
Then Save it by Pressing “Ctrl + A” .
Budget
⟿ Budget is used to maintain and Control Income and Expenditure of our Company. Every Businessman has their own Goals and Objectives. Budget helps us to meet our Goals and Objectives. Actually, Budget can be used on Ledger or Group, which helps us to Control the Expenditure or Income of the Company.
In Tally, There are two types of Budget. They are as Follow:-
On Closing Balance
⟿ In this Budget, Tally Display the Report of actual Transaction on the Basis of Closing Balance.It means, Its effect in the “Balance Sheet ''.
On Net Transactions
⟿ In this Budget, Tally Display the Report of actuall Transaction on the Basis of Net Transactions. It means, Its effect in the “Profit and Loss Alc''.
To make the Budget enabled, Press F11; and Set “Yes” at “Maintain Budgets and Controls” and Save it.
Steps For Creating Budgets 🎉
Go to the Gateway of Tally
Accounts Info
Create
[Now, you Can see Following Dialogue Boxes. ]
Enter the Budgets Name and Type of Budget,
Amount, and Save It .
Displaying the Budgets Report
Steps 🎉
Go to the Gateway of Tally
Display
Account Books
Group Summary
[Now, we can see the List of Groups.]
Then Select the Group and Budget Ledger From the list.
Now, Press Alt + B (Budget Variance) to Display the List of Budget and Select the Budget From the List to Display Report of The Budget.


Cost Center and Cost Category
⟿ Cost Center is used to analyze Ledger Figures, Means Sub-Ledger. Actually the Cost Center is used to Create the Report of Income and Expenditure of each Title (Ledger). Suppose, you’ve 5 Sales Man in your Company. And you want to keep the Record of each SalesMan about their sales Report of each Day. Cost Category is the Collection of the Cost Center. It means, it is a Group of Cost Center. In our Company, There are many types of Cost Center. And this Cost Category helps us to keep them at a Department, Which is called Cost Categories.
Examples:
More Examples:-
Computer Purchased of Rs.55000/- Micro Office Automation for the Account Department to Computer Operator Mr.Shrestha.
Here, Mr.Shrestha is Cost “Centre” and
Account Department is”Cost Categories”
Salary Paid to Staff Rs.15000/- For the Finance Department to Mt.Mallik.
Here, Finance Department is ”Cost Categories” and Mr.Mallik is Cost “Centre”
Goods Sold by Rajesh Salesman Rs.2000/-
Here, Salesman is ”Cost Categories” and
Rajesh is Cost “Centre”
To Enable Cost Center and Cost Category
Steps 🎉
1.Press or Click on F11: Features.
2.Set “Yes” at “Maintain Cost Centre” For Cost Centre and Set “Yes” at “More than ONE Cost Category” For Cost Category.
[Now, It is Activated in Your Account Info. Menu]
To Create Cost Category:
Steps 🎉
1.Account Info ⇛ Cost Categories ⇛ Create
2.Set the Following Things in the Following Title.
Name: (Type Category Name. Like, Salesman)
Allocate Revenue Item: (Set YES, If this Category is Related with Purchase, Sales, Receipt and Payment which affects the Profit and Loss Alc. Like Salesman. Because it also affects the Profit and Loss Alc.)
Allocate Non Revenue Item: (Set YES, If it is Related to Assets and Liabilities which can affect the Balance Sheet.)
To Create Cost Centre
Steps 🎉
1.Account Info ⇛ Cost Centre ⇛ Create
2.Set the Following Things in the Following Title.
Category:- (Select the Category Name From here)
Name:- (Give the Centre Name. Like, Rohan)
Under:- (Select the Group From Here.)
Examples:-
Motor Bike Purchase of Rs. 250000 on Credit From Yamaha ShowRoom Mr.Rajesh of Finance Department.
Goods Purchase of Rs. 150000 on Credit from Rahul Traders by Procurement Department As Follows:-
Mr. Pradip Rs.25000
Mr. Rahul Rs.35000
Mr. Rakesh Rs.50000
Mr. Roshan Rs.40000
Goods Sold of Rs.36000 by Salesman in Different Location as Follows:-
Salesman Location
Mr.Ajay Rs.19000 Biratnagar Rs.20000
Mr.Rajkumar Rs.11000 Dharan Rs.16000
Mr.Sanjay Rs.6000
Salary Paid to staff of Rs.75000 as Follows:-
Sales Man:-
Mr.Ajay Rs.25000
Mr.Rajkumar Rs.35000
Mr.Sanjay Rs.50000
The End***


No comments:
Post a Comment