Saturday, September 16, 2023

MS Powerpoint Notes exam of point view of Computer Operator

 MICROSOFT POWERPOINT…… ?


Application Name:- Powerpnt

Extension Name:- . pptx 


  Microsoft PowerPoint…..? Is presentation software. This is used to create the Presentation with sound effect and Animation effect with PowerPoint, You can Easily create slideshows Presentation and multimedia applications. Teachers Trainers and other presentations can use slideshows to illustrate their presentation.


# Presentation File :-    It  is the file where you create the presentation. It is save it .pptx extension.


# Slide :-   Is the page of Powerpoint where you insert Text, Picture etc.


# Slide Layout :-  Slide Layout is the page format of Slide.


  1.  How to Start PowerPoint ?

  1. Click on Start menu 

  2. Click on Programme 

  3. Click on Microsoft Office

  4. Click on Powerpoint

Or,

  1. Press Start button with R

  2. Click on Run

  3. Type “Powerpnt”

  4. Click on Ok / Press Enter key


2. How to Create Presentation ?

  1. First of all choose slide Layout

  2. Type your text or insert Picture, Shape or Word art

  3. Add Animation effect and sound effect to the text or slide 

  4. Save your Presentation and go to slide show menu

  5. Click on view show or Press F5 


3. How to Create Presentation ?

  1. Select the Slide

  2. Click on Home Tab

  3. Click on Slide Layout

  4. Choose the desire layout slide 

  5. Click on it.

4. How to insert New Slide ?

  1. Click on Home Tab

  2. Click on New Slide (Ctrl + M)


5. How to design the slide ?

  1. Select a Slide

  2. Click on Design Tab

  3. Choose the desire design 

  4. Click on it .


Note:- If you want to apply the design to the specific slide then you have to place the mouse Pointer on the design and click on the Button 

Click on apply the selected slide 


6. How to add Animation Effect to the text, Picture ?

  1. CLick on the text, Picture where you want to add effect 

  2. Go to Animation Tab 

  3. CLick on Custom Animation 

  4. Click on add effect option from the custom Animation box.

  5. Select any option 

  6. Click on more Effects 

  7. Choose the required Animation effects 

  8. Click on Ok 


7. How to Create Duplicate SLide ?

  1. Select a Slide that you want to create Duplicate

  2. Right Click on Select SLide 

  3. Click on Duplicate 


8. How to insert Slide Number ? 

  1. Click on Insert TAb 

  2. Click on Slide Number 

  3. Tick on slide Number 

  4. CLick on apply to all 


9. How to Insert Date and Time ?

  1. Click on insert TAb 

  2. Click on Date and Time 

  3. Click on Update automatically 

  4. Click on apply to all 


10. How to add effect to the Slide ?

  1. Select a Slide 

  2. CLick on Animation Tab

  3. Select Slide Transition as you like 


11. How to set Background Picture ?

  1. Click on Design Tab 

  2. Click on Background Style 

  3. Click on Background Format 

  4. Click on Picture and Texture fill

  5. Click on File 

  6. Select the Picture as you like 

  7. Choose the Desire Picture 

  8. Click on insert 

  9. Click on Ok 


12. How to fill Color in the text Box ?

  1. Select text Box 

  2. CLick on Format Tab

  3. Click on Shape fill 

  4. CLick on it. 


13. How to fill Picture in the text box ?

  1. Select Text Box 

  2. Click on Format Tab 

  3. Click on Shape fill 

  4. Click on Picture 

  5. Choose the required Picture 

  6. Click on insert 

  7. CLick on Ok


14. How to Hide Slide ?

  1. Select the Slide 

  2. Right click the mouse Button on the slide 

  3. Click on hide Slide 


15. How to Loop the Slide ?

  1. Click on Slide Show Tab

  2. Click on Set up show 

  3. Click on Looping the slide continuously until esc

  4. Click on Ok  


MS DOS Notes Exam of point view of Computer Operator

 MS -  DOS

(Disk Operating System)


  MS - DOS is known as operating system which helps us to operate the system by its command. It is very important for us. It is known as CUI (Character User Interface). 


  1.  How to open MS - DOS Programme ?

  1.  Click on Start Button

  2. Click on Programme 

  3. Click on Accessories

  4. Click on Command Prompt

Or, 

  1. Click on Start Button 

  2. Click on Run (Run box will appear)

  3. Type “cmd”

  4. Press Enter key or Ok


Command Line for Different Purpose  


  1.  To Display the all file and folders of current directory  (Location)

  1. Type : “dir” Press Enter key


  1.  To Reach the initial drive from the current position 

  1. Type : “cd\” Press Enter key


  1. To change the directory or folder of the current location. 

  1. Type : “cd <folder name>” Press Enter key


  1. To go back location one by one 

  1. Type: “cd..” Press Enter key


  1. To go from one drive to another drive  

  1. Type: “Drive Name” Press Enter key


  1. To create directory (folder) in any location. 

a.Type: “md <directory Name >” Press Enter key

    Eg. “md niit” Press Enter key


  1. To change the directory name

a.Type: “ren <old name ><new name >” Press Enter key

Eg.“ren <old name ><new name >” Press Enter key


  1. To remove (delete) empty directory.

a.Type: “rd <file name >” Press Enter key

Eg.“rd niit” Press Enter key


  1.  Copy icon : This command is used to create a text file .

  Syntax : copy con <File name>

Ex:D:\> copy con “Biratnagar” Press Enter key

Then, create a document as per requirement.

Press Ctrl + Z or F6 to save a document

At last press Enter key   


  1.  Type : This command displays the contents of previous making texts files. 

a.D:\>Type Biratnagar Press Enter key


  1. Copy : This command allows the user to copy one or more from one location to another location or at the same location by using different name. 


  1. Xcopy : This command is used to copy files any directories from one location to another.

a.Syntax: Xcopy<source><destination>

Syntax: D:\> copy <older file name><new file name>Press Enter 

Ex: D:\>copy Rk Sir D:\My Document  


  1. Move : This command allows user to move the file from one location to another location.

a.Syntax: Move<source><destination>

D:\>move D:\Biswas\*.doc E: press Enter


  1. Del or Erase : This command allows you to delete or erase the existing files. 

a.Type: “del_ <File Name >” Press Enter key

Eg: Del test.doc Press Enter key

Del text.txt         Press Enter key

Del test.xls     Press Enter key

Del test.bmp    Press Enter key


  1. To delete all file 

a.Type: “del_ <File_ Name.* >” 

Eg: Del text.* Press Enter key


  1. To delete all file from any name 

a.Type: “del*.*   Press Enter key


  1. To clear all the text  of the screen

a.Type: “cls”   Press Enter key


  1. To change the text color and background color a.Type: Color AB  


  1. To Display in full Screen 

         a.Type: “Alt + Enter”   Press Enter key  


  1. To Display the help index

         a.Type: “help”   Press Enter key  


  1. Help: This command is used to get any type of help about MS-DOS.

         a.Type: “Help <index name>”   Press Enter key  


Friday, September 15, 2023

POS Cash Invoice Tally - Notes PART 3

 POS Cash Invoice 

POS = Point of Sales  


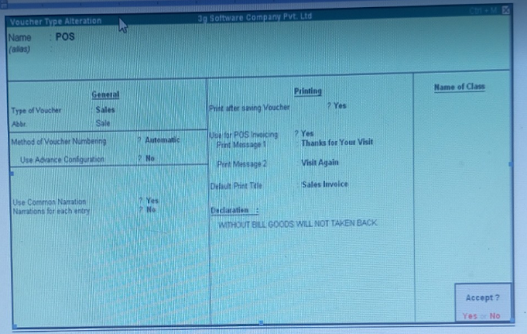
Methods of Creating POS Bill :-


  1. Select Account Info of Gateway of TAlly menu

  2. Select Voucher Types

  3. Select Create 

  4. Type POS on Name Box

  5. Select Sales on Types of Voucher 

  6. Make “Yes” on “Print after Saving Voucher”  

  7. Make “Yes” on “Use for POS Invoicing”  

  8. Type “Thank you” on print massage 1

  9. Type “Visit Again” on Print massage 2

  10. Press Ctrl + A to Save it.


Activating the Standard RAtes For Stock Items Use on POS Bill :-


  1. Press F12:Configuration key on GAteway of Tally menu 

  2. Select Accts / Inventory Info from the Configuration menu 

  3. Make “Yes” on Allow Std: Rate for Stocks Items 

  4. Press Ctrl + A to Save it.


Set the Standards RAte For Created Stock Items:-  


  1.  Select Inventory Info From GAteway of TAlly

  2. Select Inventory Info 

  3. Select Alter 

  4. Select the Stock Item from the List to set the standard rate 

  5. Make “Yes” on “Alter Standard RAtes” on the Alteration form

  6. Now we can see New Box Press Enter on Standard Cost box and set the Standard selling Price

  7. Press Ctrl + A to Save it .


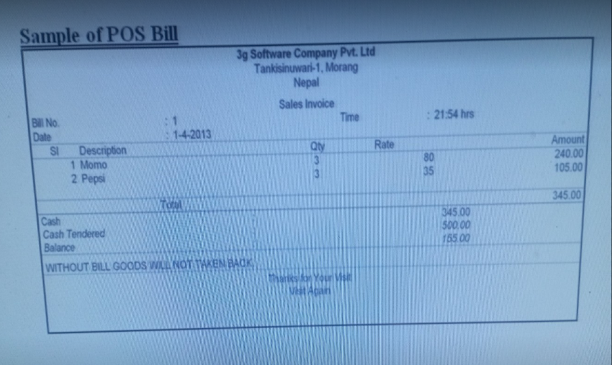
Use of  POS Cash Bill :-  


  1.  Select Accounting Vouchers 

  2.  Press F8 and Select POS Voucher From the List 

  3.  Press F2 to Set the Voucher Date 

  4.  Select Sales alc on Sales Ledger and Press Enter

  5.  Enter the Name Of Item and Press Enter as Required 

  6. Now the Cursor will be on cash field and Select Cash and Press Enter 

  7.  Now the Cursor will be on Cash Tendered and type the Amount which the Customer paid and Press Enter 

  8.  Now the Tally will automatically Calculate the Return Amount 

  9. Now Type the Nitration and Save It  

  10. While Saving the Print Message box will appear Press “Y” to print the Bill or “No” to cancel the Print order 


POS Register:- 

= After saving all bill Now We can view the POS Register, Which Show the Report about the cash Sales.

Steps:

  1.   Select Display form Gateway of Tally 

  2. Select Account Books 

  3. Select POS Register 

  4.  Now, We can see the Report 


COMPUTER OPERATOR HELPFUL NOTES HTML NOTES

  HTML   HTML stand for Hyper Text Mark up Language. It is the language used for creating webpage. To write   the HTML codes we can use ...